Setup
To begin, add the EasyPooling package / asset into your project.
Step 1 - Pool
Object pooling involves creating and maintaining a pool (or a collection) of pre-instantiated objects that can be reused instead of instantiating and destroying objects dynamically during runtime. This is particularly useful in scenarios where the creation and destruction of objects are frequent, such as in games with a large number of bullets, enemies, or any other entities.

Figure 1 - Comparing the lifecycle of GameObjects with and without pooling.
EasyPooling provides two types of pools for you:
Scene Pool: A scene pool remains a singleton throughout a specific scene, making it handy for pooling GameObjects exclusively used within that scene. This includes specific objects, enemies, terrain, or any reusable elements utilized solely in that particular scene. When transitioning to a different scene or level, a different set of items might to be pooled.
Global Pool: A global pool is likewise a singleton, persisting throughout the entire duration of the game runtime. It proves beneficial when you have GameObjects that you intend to reuse throughout the entire application.
Due to their singleton behavior, you have the option to either create a GameObject, attach the required pool behavior in your scene, or directly access it via code. In the latter case, the pooling system itself handles the creation and maintenance of the pool GameObjects.
While runtime this will look in your unity editor hierarchy like the following image.
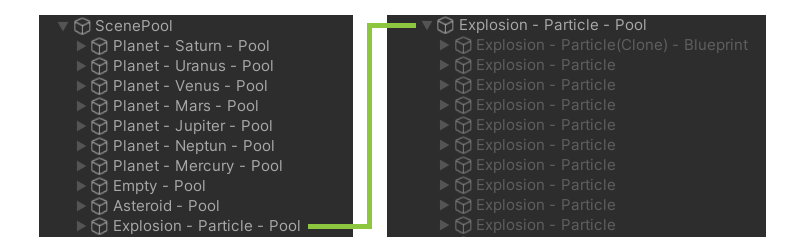
Figure 2 - Left a ScenePool with 'sub'-pools and right a unfolded 'sub'-pool showing the pooled GameObjects.
On the left side, you can observe a scene pool containing several sub-GameObjects. Each one represents a 'sub'-pool responsible solely for a specific GameObject type to be pooled. Note the 'Empty - Pool' GameObject. This particular 'sub'-pool exclusively contains empty GameObjects along with their transform. When you spawn these GameObjects, you will need to add some decoration, ensuring that the GameObject is not empty. How to do so, we will delve into this topic in the next chapter.
On the right side, you can see an expanded 'sub'-pool, specifically the 'Explosion - Particle - Pool', which is exclusively dedicated to explosion particles utilized in the attached demo. Upon creating the pool, the explosion 'sub'-pool is already populated with a predetermined quantity of explosion particle GameObjects. Given their frequent use in the demo, this ensures efficient recycling of their usage from beginning.
Register
The creation of such a 'sub'-pool results of registering a GameObject as poolable in either a scene or the global pool. EasyPooling generally supports two types of 'sub'-pools:
Empty Pool: This is the default 'sub'-pool created when a scene or the global pool is initialized. It contains empty GameObjects with only their transforms. Upon spawning, you can customize them using the IDecorator interface, which we will discuss later.
Blueprint Pool: A blueprint 'sub'-pool allows to spawn clones of a registered GameObject, typically Prefabs. This blueprint 'sub'-pool enables a easy spawning and reusing of a predefined GameObject.
Spawn
When spawning from a pool, the system initially attempts to reuse existing pooled GameObjects. However, if none are available in the pool, a new instance will be created. To spawn a GameObject from the pool, you invoke the 'Spawn' method. Various spawn methods are available, and a few examples are illustrated in the code below.
// Spawn an empty GameObject from the current scene pool.
ScenePool.Instance.Spawn()

// Spawn an empty GameObject from the current scene pool and apply the passed IDecorator.
ScenePool.Instance.Spawn(IDecorator)

// Spawn a blueprinted GameObject from the current scene pool.
ScenePool.Instance.Spawn(Blueprint)
The spawning process triggers callbacks on the spawned GameObject attached MonoBehaviours which inherit from the IPoolable interface. The detailed explanation of the IPoolable interface is provided in the next chapter.
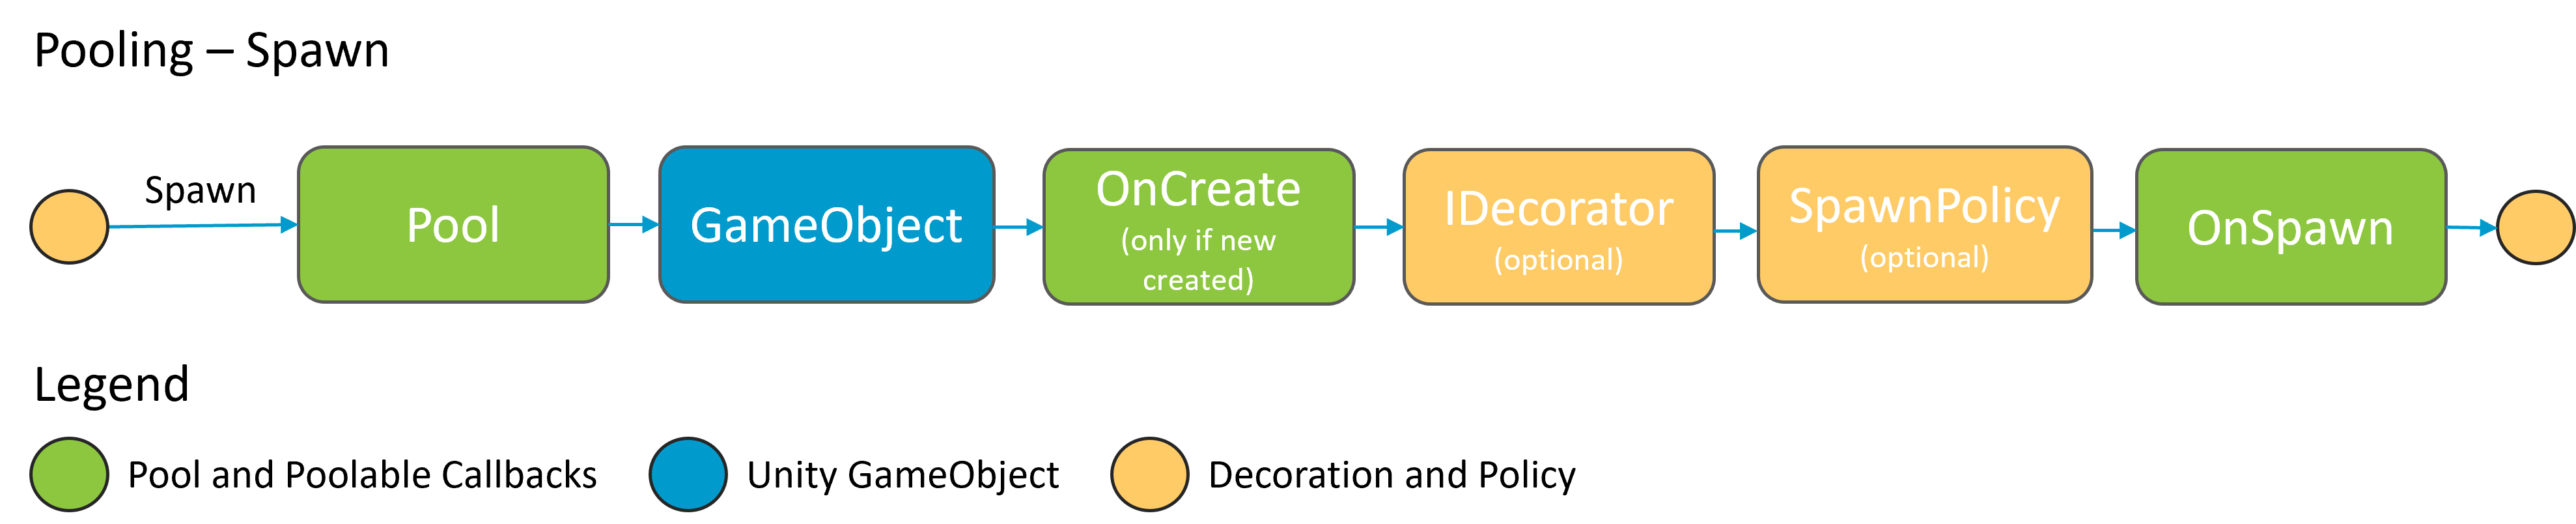
Figure 3 - Spawn process of GameObjects with pooling.
In the displayed image, you can observe the simplified spawn process, along with the triggered callbacks and applied decoration and policy.
Despawn
Despawning is the counterpart to spawning. When you no longer wish to use a GameObject, the typical approach would be to destroy it. However, with pooling, the goal is to reuse it. Therefore, you would invoke the 'Despawn' method on the pool. The available despawn methods are demonstrated in the code below.
// Despawn a GameObject and place it into the scene pool.
ScenePool.Instance.Despawn(GameObject)

// Despawn a GameObject and place it into the scene pool and apply an undecoration to remove Behaviors or child GameObjects.
ScenePool.Instance.Despawn(GameObject, IUnDecorator)
The despawning process triggers callbacks on the GameObject, that is being despawned, attached MonoBehaviours inheriting from IPoolable. The detailed explanation of the IPoolable interface is provided in the next chapter.
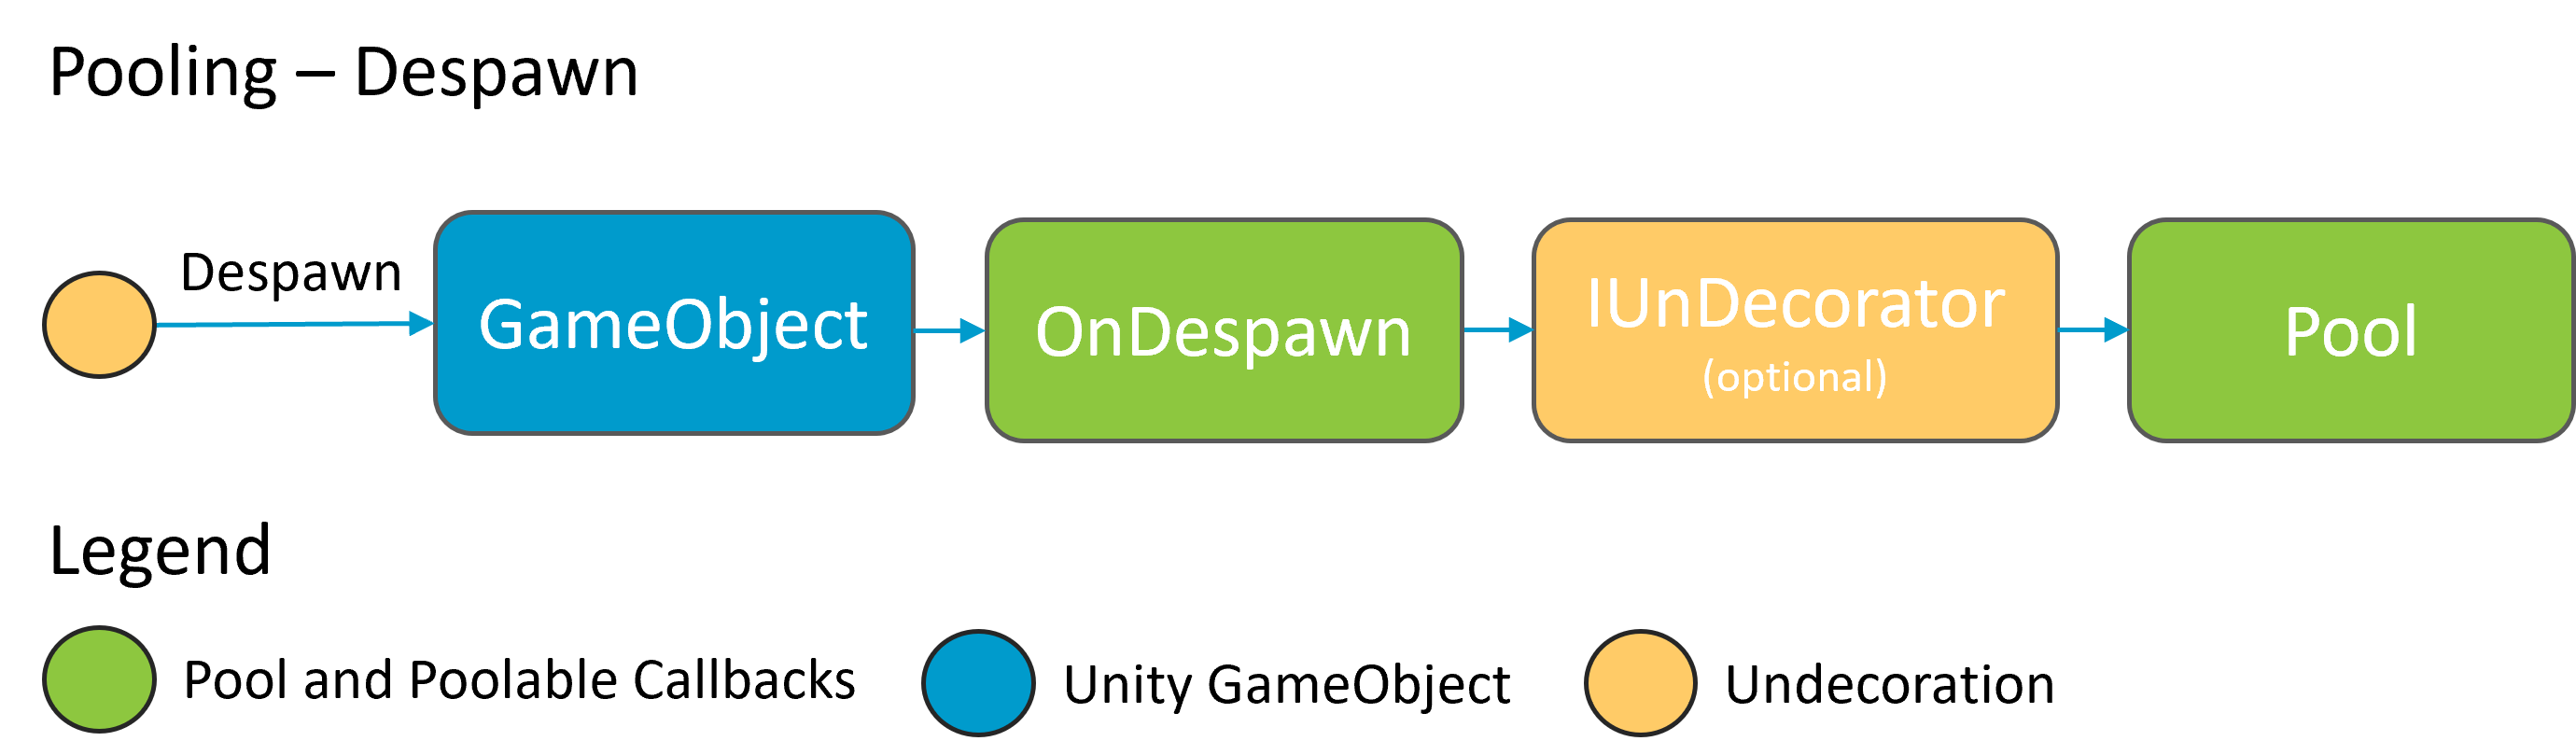
Figure 4 - Despawn process of GameObjects with pooling.
In the displayed image, you can observe the simplified despawn process, along with the triggered callbacks and applied undecoration.
Step 2 - Poolable
The above chapter gave a short overview using pools and poolable GameObjects. Now let's speak about the lifecycle of poolable GameObjects a bit more detailed.
In Unity, when you create a GameObject, the following lifecycle callbacks occur: Awake, Start, Update..., OnDestroy. This is the same for each GameObject. However, when using pooling, you reuse GameObjects instead of destroying and re-instantiating them. As a result, Awake and Start are only invoked once during the instantiation of the GameObject or its Behaviors. So EasyPooling has introduced two new methods to map this process:
OnCreate: Called once when the GameObject is newly created in the pool, but only if the pool is empty.
OnSpawn: Called every time, after OnCreate, when a new or reused GameObject is spawned by the pool.
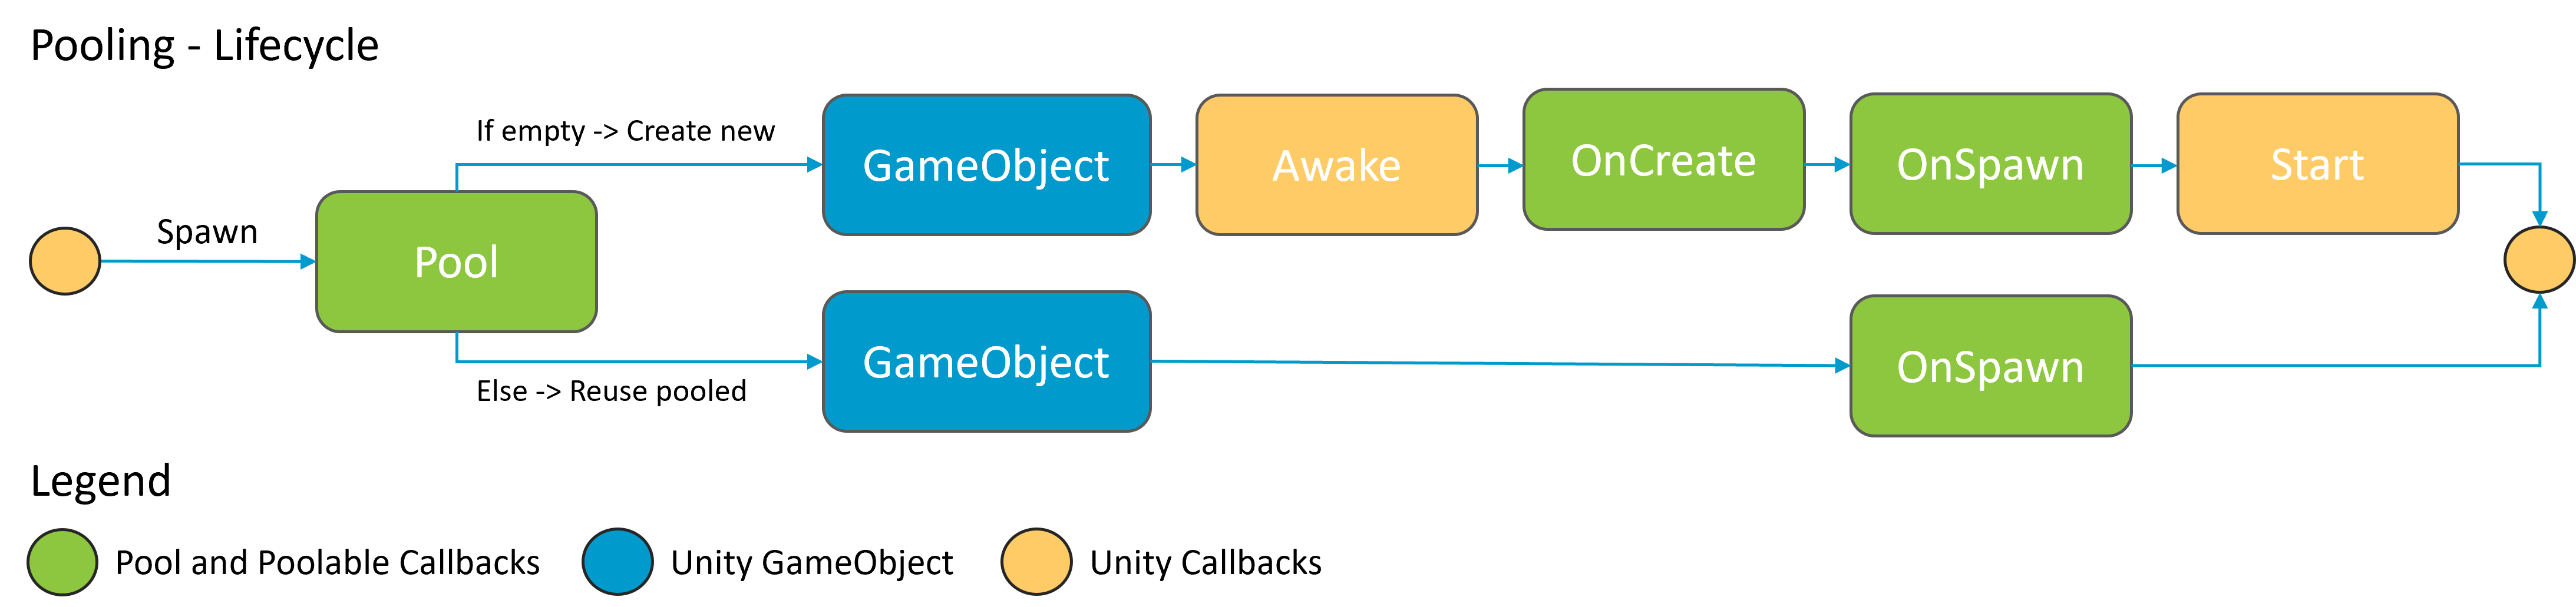
Figure 5 - Spawn process of new GameObjects and pooled.
As you see in the image, when calling Spawn on a pool, there are two scenarios. If the pool is empty, a new GameObject will be created; otherwise, if there are already pooled GameObjects, they will be reused.
Create: In this case, you see the familiar callbacks, Awake and Start, along with the new callbacks introduced by pooling, OnCreate, and OnSpawn. Reserve Awake for references that are needed only once, such as references to other components or behaviors. For everything else you would typically place in Awake or Start, use OnSpawn.
Reuse: For pooled and reused GameObjects, the only callback they receive is OnSpawn. Utilize this callback to reset or apply startup settings.
Interface
To enable pooling for a GameObject, at least one MonoBehaviour must implement the IPoolable interface.
namespace GUPS.EasyPooling.Pooling

/// <summary>
/// Represents an interface for poolable objects, providing methods to manage object lifecycle events within and outside of a pool.
/// </summary>
/// <remarks>
/// <para>
/// The <see cref="IPoolAble"/> interface defines a contract for objects that can be used for pooling. It includes properties to identify
/// the owning pool and the current pooled state, along with methods to handle key lifecycle events.
/// </para>
/// <para>
/// Implementations of this interface are expected to handle events such as creation, spawning, despawning, and destruction,
/// allowing for efficient management of object reuse within a pool.
/// </para>
/// </remarks>
public interface IPoolAble
The IPoolAble interface provides you with four callbacks (methods):
OnCreate: Called when the poolable object is newly created by the pool and not received from any already pooled object.
OnSpawn: Called when the poolable object is spawned from the pool or after OnCreate.
OnDespawn: Called when the poolable object is despawned and returned to the pool.
OnDestroy: Default Unity callback; Called when the poolable object is destroyed and will not return to the pool.
Also you get two properties:
Owner: The pool this poolable object belongs to.
Pooled: Indicating whether this poolable object is inactive in its pool.
If you don't need any specific actions when a GameObject is spawned, you can use the default pooling behavior (DefaultPoolable) and attach it to the GameObject. This class implements the IPoolable interface but has an empty implementation.
namespace GUPS.EasyPooling

/// <summary>
/// Represents a default implementation of the <see cref="IPoolAble"/> interface for making a GameObject poolable.
/// This implementation does nothing in terms of custom behavior, serving as a simple marker for poolable GameObjects.
/// For specific and custom functionality, it is recommended to implement the <see cref="IPoolAble"/> interface directly
/// on your own MonoBehaviour and define the desired behaviors in the corresponding methods.
/// </summary>
/// <remarks>
/// <para>
/// The <see cref="DefaultPoolAble"/> class extends <see cref="MonoBehaviour"/> and implements the <see cref="IPoolAble"/> interface.
/// It provides default, empty implementations for each method defined in the <see cref="IPoolAble"/> interface: <see cref="OnCreate"/>,
/// <see cref="OnSpawn"/>, <see cref="OnDespawn"/>, and <see cref="OnDestroy"/>.
/// </para>
/// </remarks>
public class DefaultPoolAble : MonoBehaviour, IPoolAble
Decorator
In the pooling step chapter, we discussed the decoration of poolable GameObjects. This is beneficial for empty GameObjects when they are spawned, involving for example the assignment of MonoBehaviours and parameter or settings. For instance, consider pooling bullets in a shooter game. These bullets may require a Rigidbody and a Collider. These components can be assigned through a decorator, and additional settings such as speed and direction can also be configured.
To do so an implementation of an IDecorator interface is required.
namespace GUPS.EasyPooling.Decorator

/// <summary>
/// Represents an interface for decorators that can be applied to GameObjects.
/// </summary>
/// <remarks>
/// <para>
/// The <see cref="IDecorator"/> interface defines methods for applying decoration to GameObjects.
/// Decorators can be used to modify the appearance, behavior, or other properties of GameObjects based on specific requirements.
/// </para>
/// </remarks>
public interface IDecorator
The IDecorator has one property:
- OnCreateOnly: Gets a value indicating whether this decorator should only be applied when a new GameObject is created.
And one method:
- OnDecorate: Called while spawning to apply decoration to a GameObject.
To spawn a GameObject using a decorator you would call the following method:
// Spawn an empty GameObject from the current scene pool and apply the passed IDecorator.
ScenePool.Instance.Spawn(IDecorator)
Blueprint
A blueprint is used to spawn and reuse GameObjects based on a predefined template, mostly based on a Prefab. A blueprint is also an implementation of an IDecorator. The blueprint decorator gets created when a GameObject is registered in a Scene- or GlobalPool as blueprint.
namespace GUPS.EasyPooling.Blueprint

/// <summary>
/// Represents a blueprint for a GameObject, specifying its name and associated behavior blueprints.
/// </summary>
/// <remarks>
/// <para>
/// The <see cref="GameObjectBlueprint"/> class allows the definition of a blueprint for a GameObject,
/// encapsulating information such as its name and a list of associated <see cref="BehaviourBlueprint"/> instances.
/// </para>
/// <para>
/// The class implements the <see cref="IBlueprint"/> and <see cref="IDecorator"/> interfaces, providing a name
/// for a GameObject and enabling the decoration of a poolable GameObject by adding and configuring behaviors based
/// on the behaviour blueprints.
/// </para>
/// </remarks>
public class GameObjectBlueprint : IBlueprint, IDecorator
To register a GameObject as Blueprint there are two options. The first one is via code, available on the Scene- or GlobalPool instances.
/// <summary>
/// Registers a GameObject as poolable blueprint to the pool. This process creates a new local 'sub'-pool, clones the passed GameObject
/// and attaches it to the new created 'sub'-pool as blueprint reference. If the GameObject has no <see cref="IPoolAble"/> component attached,
/// the <see cref="DefaultPoolAble"/> component will be added.
/// </summary>
/// <param name="_Name">The name or identifier of the blueprint.</param>
/// <param name="_Blueprint">The GameObject blueprint to register.</param>
/// <param name="_PoolingStrategy">The pooling strategy to use (optional, default is <see cref="EPoolingStrategy.DEFAULT"/>).</param>
/// <param name="_Capacity">The initial capacity of the pool (optional, default is 25).</param>
public void Register(String _Name, GameObject _Blueprint, EPoolingStrategy _PoolingStrategy = EPoolingStrategy.DEFAULT, int _Capacity = 25)
The second option is using the Unity Editor Inspector. Create a GameObject and assign a Scene- or GlobalPool MonoBehaviour. Select this created pool GameObject and open the Inspector.
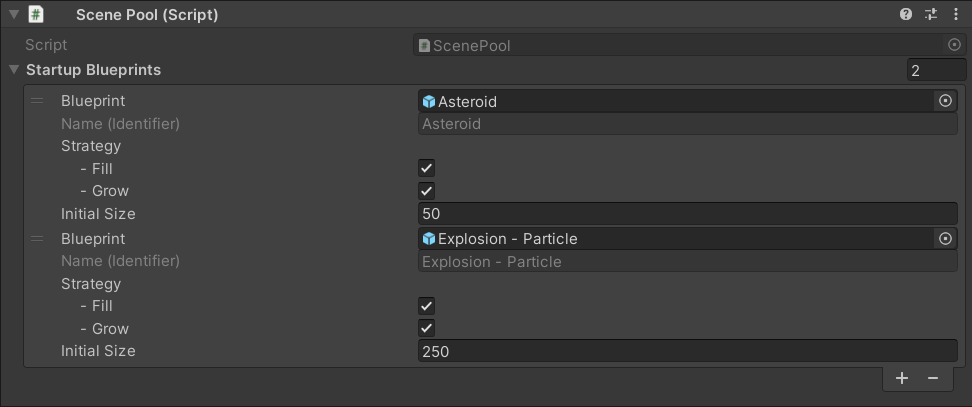
Figure 6 - Demo ScenePool with 'Asteroid' and 'Explosion - Particle' registered as Blueprints.
The shown image is a part of a demo within the asset. Two Prefabs are designated as Blueprints. For those you can also configure pooling strategies and define an initial or maximum pool size.
That's it. You are ready to go :)!