Protected PlayerPrefs
Unity's PlayerPrefs serve as a convenient means of saving user settings and data. However, they lack protection or encryption, which makes them vulnerable to easy modification. The AntiCheat Protected PlayerPrefs provide a solution to this security problem.
How to use
Using these protected PlayerPrefs is straightforward, with three available options:
ProtectedPlayerPrefs: This option enhances Unity's default PlayerPrefs by adding extra security features while maintaining the same functionality. The protected preferences are stored in the standard default location.
ProtectedFileBasedPlayerPrefs: A custom implementation of Unity PlayerPrefs that lets you save protected preferences to a specific file path (default:
Application.persistentDataPath). To use a custom file path, setProtectedFileBasedPlayerPrefs.FilePath. Once configured, it functions just like the standard Unity PlayerPrefs.Inspector: This option leverages ProtectedPlayerPrefs but allows you to assign and manage protected preferences directly through the Inspector. You can access and modify these preferences using properties in your code.
Protected PlayerPrefs
Replaces the standard Unity PlayerPrefs with a more secure alternative. You can find it in the namespace GUPS.AntiCheat.Protected.Storage.Prefs. It's simple to use - just swap out PlayerPrefs with ProtectedPlayerPrefs. For example, instead of writing PlayerPrefs.GetInt("MyKey"), you would use ProtectedPlayerPrefs.GetInt("MyKey"). The save location remains the same as Unity's default implementation, ensuring compatibility. For instance:
- On Windows, PlayerPrefs are stored in the registry under the HKCU\Software[company name][product name] key.
- On Android, data is stored (persisted) on the device. The data is saved in SharedPreferences. The PlayerPrefs data is physically stored in /data/data/pkg-name/shared_prefs/pkg-name.xml.
- On iOS, PlayerPrefs are stored in /Library/Preferences/[bundle identifier].plist.
- ...
The secure alternative, ProtectedPlayerPrefs, also supports storing a much wider range of data types:
Byte,
ByteArray,
Boolean,
Int16,
Int32,
Int64,
UInt16,
UInt32,
UInt64,
Single,
Double,
Decimal,
Char,
String,
Color,
Color32,
Vector2,
Vector2Int,
Vector3,
Vector3Int,
Vector4,
Quaternion,
Rect,
Plane,
Ray,
Matrix4x4
Code 1: Supported data types.
To make it easy to replace Unity's PlayerPrefs, ProtectedPlayerPrefs supports all the same methods as the Unity version, along with some additional ones:
//Bool
ProtectedPlayerPrefs.SetBool("My Bool Key", true);
bool protectedBoolValue = ProtectedPlayerPrefs.GetBool("My Bool Key");
Debug.Log("Real Value: " + protectedBoolValue);

//Int
ProtectedPlayerPrefs.SetInt("My Int Key", 1234);
int protectedIntValue = ProtectedPlayerPrefs.GetInt("My Int Key");
Debug.Log("Real Value: " + protectedIntValue);

//Float
ProtectedPlayerPrefs.SetFloat("My Float Key", 1234.56f);
float protectedFloatValue = ProtectedPlayerPrefs.GetFloat("My Float Key");
Debug.Log("Real Value: " + protectedFloatValue);

//String
ProtectedPlayerPrefs.SetString("My String Key", "Hello World!");
string protectedStringValue = ProtectedPlayerPrefs.GetString("My String Key");
Debug.Log("Real Value: " + protectedStringValue);

//Vector2
ProtectedPlayerPrefs.SetVector2("My Vector2 Key", new Vector2(123.55f, -10012.2f));
Vector2 protectedVector2Value = ProtectedPlayerPrefs.GetVector2("My Vector2 Key");
Debug.Log("Real Value: " + protectedVector2Value);

//Vector3
ProtectedPlayerPrefs.SetVector3("My Vector3 Key", new Vector3(123.55f, -10012.2f, 771123f));
Vector3 protectedVector3Value = ProtectedPlayerPrefs.GetVector3("My Vector3 Key");
Debug.Log("Real Value: " + protectedVector3Value);

//Vector4
ProtectedPlayerPrefs.SetVector4("My Vector4 Key", new Vector4(1, 2, 3, 4));
Vector4 protectedVector4Value = ProtectedPlayerPrefs.GetVector4("My Vector4 Key");
Debug.Log("Real Value: " + protectedVector4Value);

//Quaternion
ProtectedPlayerPrefs.SetQuaternion("My Quaternion Key", new Quaternion(1, 2, 3, 4));
Quaternion protectedQuaternionValue = ProtectedPlayerPrefs.GetQuaternion("My Quaternion Key");
Debug.Log("Real Value: " + protectedQuaternionValue);
Code 2: Simply replace the PlayerPrefs methods with ProtectedPlayerPrefs methods.
Protected File Based PlayerPrefs
If you prefer not to use the default Unity PlayerPrefs save location, ProtectedFileBasedPlayerPrefs can be useful. You can find it in the namespace GUPS.AntiCheat.Protected.Storage.Prefs. It allows you to securely save player preferences at a file location of your choice. While the default file path is Application.persistentDataPath, you can easily assign a custom location if needed.
public static class ProtectedFileBasedPlayerPrefs
{
    // ...

    /// <summary>
    /// Gets or sets the custom file path for storing player preferences.
    /// Default is: Application.persistentDataPath + System.IO.Path.PathSeparator + "playerprefs.dat"
    /// </summary>
    public static String FilePath { get; set; } = Application.persistentDataPath + System.IO.Path.PathSeparator + "playerprefs.dat";

    // ...
}
Code 3: Assign a custom file path to ProtectedFileBasedPlayerPrefs.FilePath.
Both ProtectedFileBasedPlayerPrefs and ProtectedPlayerPrefs share identical functionality and usage patterns. The only distinction between them is their storage location. All methods, properties, and operations remain consistent across both implementations.
Inspector
If you prefer using the Unity Inspector to assign data rather than doing it through code, the implementation of protected PlayerPrefs is quite useful. AntiCheat provides support for all common Unity PlayerPrefs types, allowing you to access them through properties and code. Here's an example of how it might look in your MonoBehaviour:
public class PlayerPrefs_Behaviour : MonoBehaviour
{
    public ProtectedBoolPref protectedBool;
    public ProtectedFloatPref protectedFloat;
    public ProtectedIntPref protectedInt;
    public ProtectedStringPref protectedString;
    public ProtectedVector2Pref protectedVector2;
    public ProtectedVector3Pref protectedVector3;
    public ProtectedVector4Pref protectedVector4;
    public ProtectedQuaternionPref protectedQuaternion;
}
Code 4: Easily access your protected PlayerPrefs through properties in your code.
In the Unity Inspector this might look like:
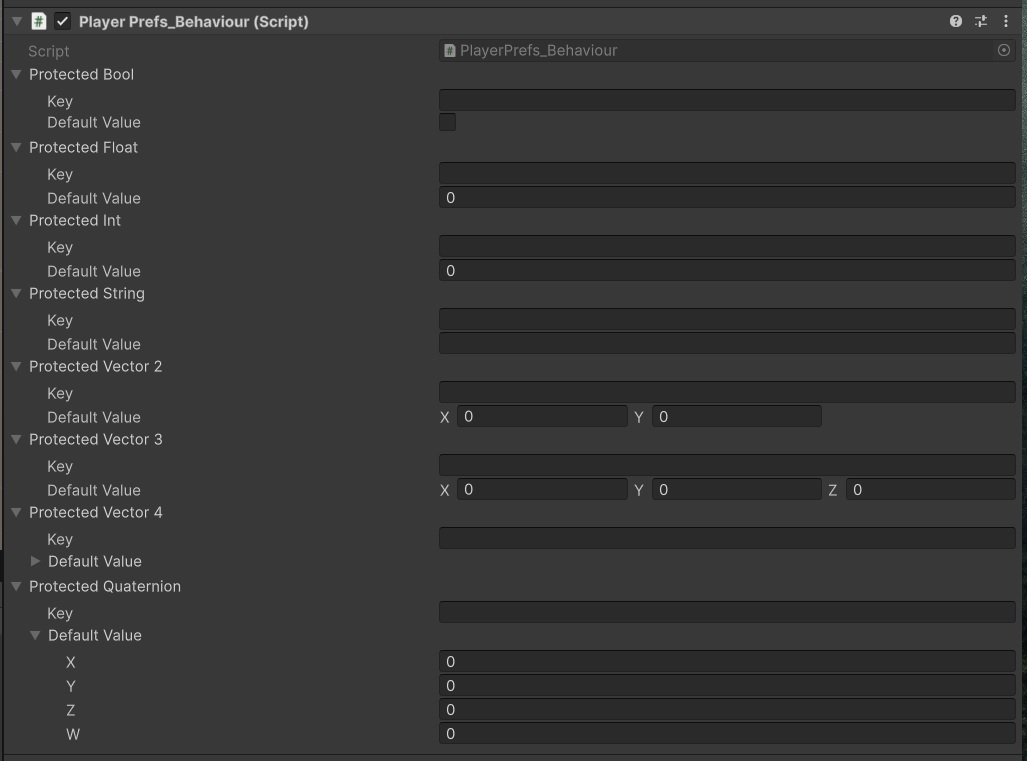 Figure 1: Assign your protected PlayerPrefs through the Unity Inspector.
Settings
The protected PlayerPrefs include various settings that let you customize the protection methods. To access these settings, navigate to the Unity Editor and open Project Settings -> GuardingPearSoftware -> AntiCheat. Then, go to the 'PlayerPrefs - Settings' section.
 Figure 2: In this section you can configure the security settings for your player preferences (PlayerPrefs).
You will find the following settings:
- Hash Key: Check to hash the player preference key (default or file based). Uncheck to not hash the player preference key. When enabled, the key is stored as a hash name instead of its original name. Recommended: true.
- Value Encryption Key: The key used to encrypt the player preference value (default or file based). If a key is not assigned (empty or null), the value will remain unencrypted. If you change the key, the already written values will no longer be readable - keep that in mind! Recommended.
- Allow Read Any Owner: Check to permit anyone to read the stored player preference (default or file based), so players can share their player preferences. Uncheck to only allow the owner (device based) who created the player preference to access it. By default, the owner is identified using the device's unique identifier from Unity, accessed via
UnityEngine.SystemInfo.deviceUniqueIdentifier. This feature is useful for sharing player preferences between different users or restricting access to them, for example if a user copies and pastes them between devices. Recommended: Optional. - Verify Integrity: Check to enable verification of the integrity of the player preferences (default or file based). Uncheck to not verify integrity. The integrity check relies on a hash that is calculated from the data type, value, and owner, and is stored in a signature beside the data. Recommended: Optional.